Saturday, September 12, 2015

A trip to Washington DC and a new Highpoint

Kim and I took had never been to Washington D.C. before and we both had really wanted to go.  Since we had moved to Pittsburgh, we quickly realized that it was within striking distance in the car and we started planning a trip.  J is getting better at sitting in his carseat for longer periods of time too so we thought this would be a fun little trip.

We stayed at a Hotel right on Pennsylvania Ave, almost exactly a mile from the White House in Georgetown.  I would highly reccomend it, it was named Avenue Suites, and like the name implies it was an all suite property, which meant that J had his own room for his naps (and we didn't have to hide in the bathroom while he napped like a normal hotel).  The kicker was that it was also one of the cheapest hotels for the long weekend we were in town.  I will definately stay there again.

Day 1:

We spent the first two days touring the monuments in/around D.C. and, much like I expected, I was stunned at the care that was taken to get things just right.  Almost everywhere I have been accross the country I have gone out of my way to visit any nearby National Parks, National Monuments, National Battlefields or really anything with the name national in front of it.  The reason, really, is that the National Park Service does an incredible job of preserving the history and beauty of this great nation. 

We brought our bikes with us and had J's bike trailer hooked up so that we could maximize our time and see as much as we could in a few short days. 


Our trip started with a quick ride down historic Pennsylvania Avenue to the White House.  A word of note, the secret service doesn't allow you to lock up your bike anywhere near the white house, so if you want to ride down there you will need to find a different place to lock it up. (we found that out the hard way). We didn't linger there long but stayed long enough to take a look at the building and the grounds and then hopped back onto our bikes for a ride down to the national mall.


Once on the mall we rode up to the Washington Monument, which is much bigger in person than it looks like in pictures.  It is really hard to believe that it was built when it was.  Especially since when it was built it was the tallest building in the world.  Pretty incredible.


From there we left the bikes and walked down to the WWII Memorial, where I got a few pictures of the War in the Pacific side and some of the Massachusetts (my home state) section.  My grandfather fought in the pacific so I felt a bit of a personal connection to the memorial.

From there we walked past the reflecting pool to the Lincoln Memorial which was awesome. 

On our way back we walked along the Vietnam Memorial Wall before heading back to our bikes at the Washington Monument.


Once back at the monument we had a quick snack and then back on the bikes to check out a few more places before heading back to the hotel.


 Our first stop after our snack was the Martin Luther King, Jr. Memorial.


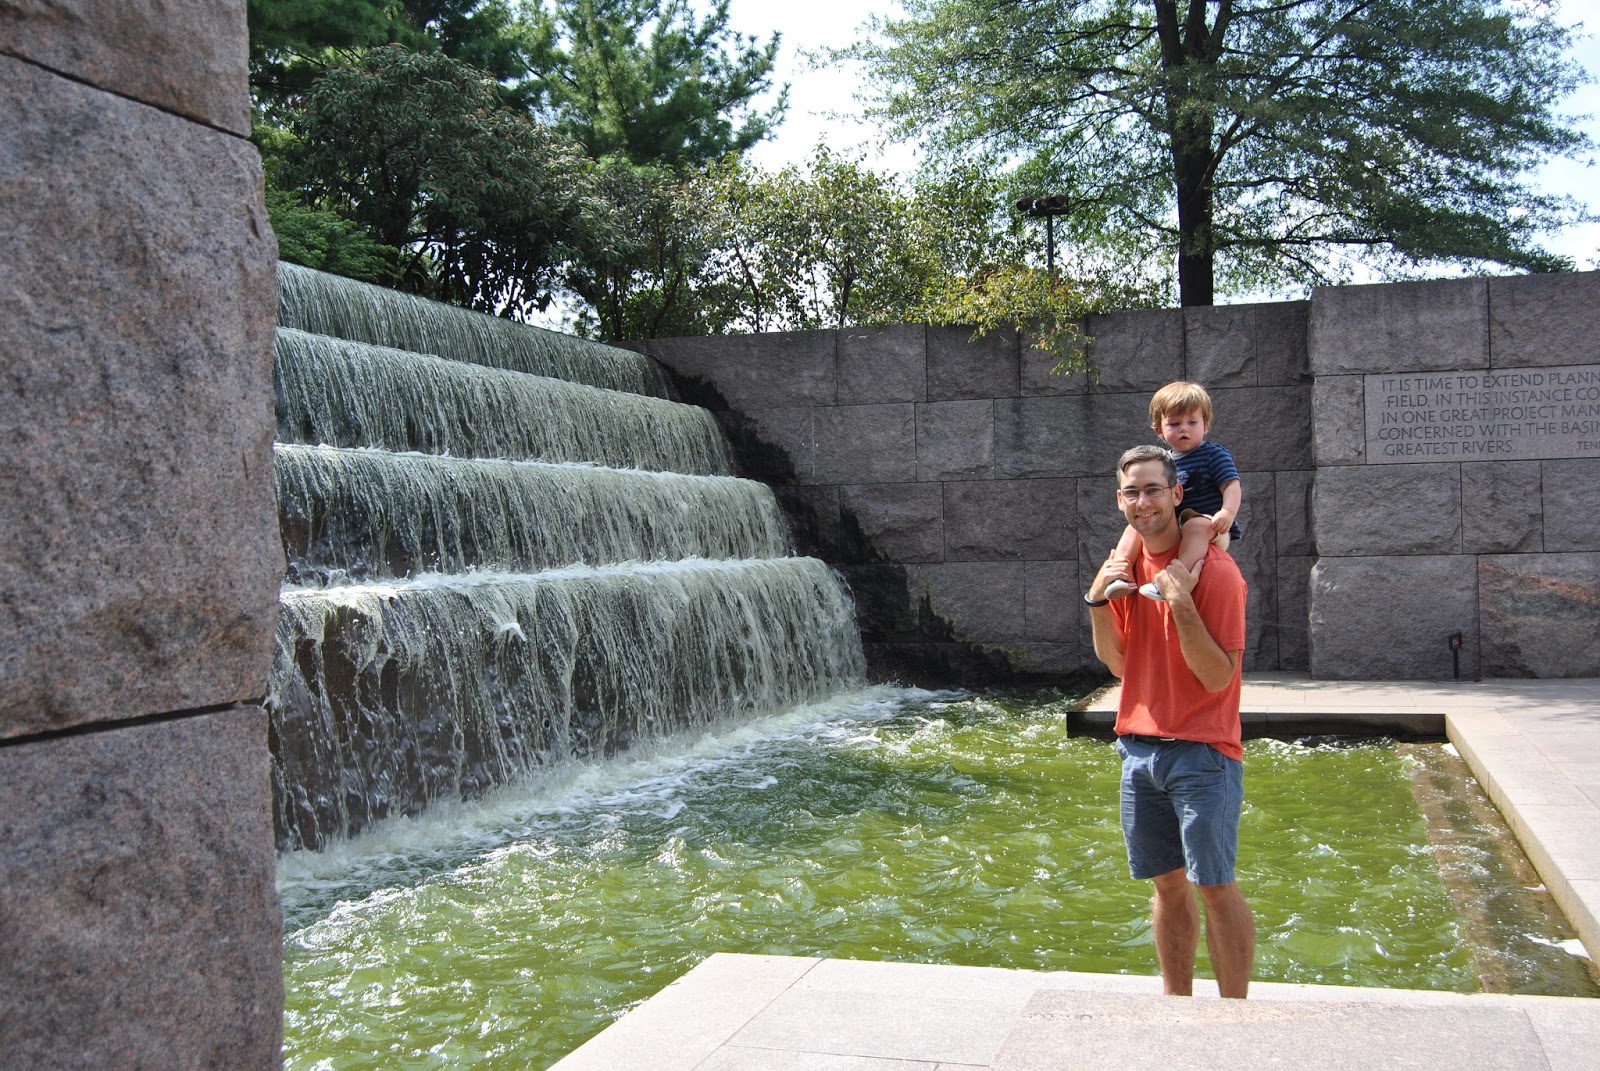
We then made our way over to the Franklin Delano Roosevent Memorial where we walked around for quite a while and then sat down for a picnic lunch.  This was probably one of my favorite memorials as it sort of told a story as you walked through it.  It was organized by periods of his presidency from beginning to end and you really got to feel a sense of change in the country as you walked through it.


Finally though it was time to head back to the hotel for some rest and a nap.

Day 2:

For our second day of the trip we really didn't have an agenda but we had heard that Theodore Roosevelt Island was a great place to ride bikes.  It ended up being one of those mornings where everything goes wrong.  

We loaded up the car with our bikes and all and drove down to the parking area just outside the Island.  Now it is no easy task to load up a toddler into a bike trailer, get in your biking gear and get ready to go on a long ride so by the time we unloaded everything out of the car we were just ready to go.  Except we initially went the wrong way out of the parking lot and ended up going away from the Island and back towards the city...  so we turned around and headed back towards the island.  There is this really nice little footbridge leading out onto the island from the parking area and once we figured out that that is how you go to get to the island itself we made our way over there.  Only to see, at the last minute, a sign saying no bikes!  So again, we turned around and went back to the car unloaded all of our bike gear back onto the rack and decided we would just walk instead.  We put J in his little umbrella stroller (we left the big jogging stroller at home) and took off over the bridge, finally we were making some progress.  Until, that is, we realized that not only is it not friendly to bikes but the trails are near impossible to push a stroller on.  It was at this point that I realized we had gotten some bad advice.  but we weren't deterred, I picked up the stroller and ran back to the car the bike that turned into a walk with a stroller just turned into a hike.


Once all of the missteps had passed though it actually was a pleasant little morning.  We took a short hike around the perimeter of the island, part of which is on a cool little footbridge over a marsh.  At the end of the hike we stopped at the actual memorial itself which was really impressive.  An added bonus was that we were one of the only ones there.  I think that a lot of people don't get out to this monument because it is a little off the beaten path.  That being said, I would absolutely recommend seeing it in person.  (just don't bring a bike...or a stroller).

While J was napping I decided to go for a run and see some of the monuments that we had missed.  I left the hotel and headed down Pennsylvania one more time and ran by a few of the familiar ones from the day before,  but this time I stopped at the Korean War Memorial and spent a little bit of time there.  Despite it's size there is actually a lot to see at this site.

From there I headed down past the FDR memorial and stopped to read the inscriptions on the inside of the Jefferson memorial.  Finally I took one last loop around the reflecting pool and headed back to the Hotel.


When J woke up from his nap we took a walk around Georgetown and stopped in at the Old Stone House which is part of the Rock Creek Park.  It is the oldest house in Washington D.C. and it was surprisingly interesting.  We had walked by it a few times during the trip but never made it inside but I'm glad we made the detour, it is worth the 20 or so minutes if you find yourself in Georgetown.

Day 3:

Our last day in the city and we didn't have any plans again, except that Kim needed to have a cupcake at Georgetown Cupcakes.  They don't open until 10am and we have a toddler who wakes up at 6am so we had some time to kill.

I am always out looking for a new highpoint to conquer so we took the short drive up to Fort Reno to pick up the Washington D.C. highpoint.  This one was surprisingly hard to find.  It is just a survey marker in an open field so you have to be right on top of it to find it.  Also it is not actually the highest point around it as there are a lot of man-made areas in the vicinity that rise above it.  It took a little bit of figuring but we eventually made it.  We parked at the Deal Middle school and walked up a small path once we got to the large open field it was a quick left and up a little hill and we were there.  There wasn't anything to look at so we took a few pictures and made our way back into the city for some delicious cupcakes.


 So that was it.  I hope you enjoyed reading about our travels!

Monday, August 10, 2015

Pittsburgh Triathlon- Race Recap

Pittsburgh Triathlon 2015- Race Recap
Well, it was my first race since the Pittsburgh Marathon and I can say that even though I didn't have an incredible time, I was pretty happy with my performance on the Pittsburgh Triathlon.  This was only my second Triathlon ever and my first Olympic (international) distance Tri.  So I was really just happy to finish.  Going into this race my only two goals were, and in this order:  Number one; not drown on the swim and end up washed downstream to Emsworth Locks and Dam, and number two;  Finish the race.  Mission complete!  So here goes for the race recap.

The train up:
 Kim and I are still really new to the Triathlon scene so the train up for this race was a lot of trial and error.  Add to that the fact that we had just come out of Marathon training for the Pittsburgh Marathon and were also training for the Chicago Marathon later this fall.  So we needed to get a good plan together.  We ended up going with a Balanced plan of two swims, two bikes and two runs a week.  We also went with a plan that was based on training load vs mileage which was a new concept for us.  Essentially with training load you are looking at using time based workouts where you will increase by 10% each week for three weeks and then have a recovery week where you scale it back by 40%.  It sounds complicated, and it was when we got started but overall it was pretty successful. It was definitely a change though and as we got later into the plan and the times for the workouts increased it got increasingly more difficult to accomplish.  I mean, who has time for a nearly three hour workout mid week when you work full time and have a toddler?  I will do a separate post on how we worked through those issues but needless to say we had to get creative.  For me the most difficult part was getting my swims in, biking and running are pretty accessible (especially when you have a treadmill and a trainer in the basement but the swims are harder to swing.  We ended up getting a membership to a local pool which had 25m and 50m lanes which helped a lot.  Kim was a competitive swimmer growing up so she was comfortable in the water, me...... lets just say the swim is something I need to work on.  Anyway if you are interested here is the train up plan we used.
8
15 JUN
35-Swim
5x(kick 1 length, rest 15 sec, swim 1 length, rest 30 sec)
Off
58-Swim
Run- Sprint workout

3x1600 (400 RI)
Run- Tempo

2 Miles Easy
2 Miles ST    
2 Miles Easy
Off
Long Run-

8 Miles at MP+30
6h 13m
 
70-Bike
10 min easy, 15 min tempo, 5 min easy, 10 min tempo, 10 min easy, 15 min tempo, 5 min easy
373m
7
22 JUN
38-Swim
kick 2 lengths
swim 20 min
kick 2 lengths
Off
Run- Tempo

1 Mile Easy
5 Miles MP
1 Mile Easy
Run- Sprint workout

4x800 (2 min RI)
128-Bike
Off
Long Run-

9 Miles at MP+45
6h 49m
10%
77-Bike
17 min easy
17 min temp
8 min easy
8 min hard
10 min easy
10 min tempo
7 min easy
409m
6
29 JUN
42-Swim

Off
70-Swim
Run- Sprint workout

1200, 1000, 800, 600, 400 (200 RI)
Run- Tempo

1 Mile Easy
5 Miles LT
1 Mile Easy
Off
Long Run-

10 Miles at MP+45
7h 30m
10%
85-Bike
20 min easy
10 min tempo
10 min easy
10 min tempo
10 min easy
10 min tempo
5 min hard
10 min easy
450m
5
6 JUL
25-Swim
10x(kick 1 length, rest 15 sec)
swim 10 lengths non stop 
Off
Run- Tempo

1 Mile Easy
4 Miles MT
1 Mile Easy
Run- Sprint workout

5x1000 (400 RI)
85-Bike
Off
Long Run-

11 Miles at MP+45
4h 30m
-40%
51-Bike
10 min easy
5x(3 min hard 3 min easy)
11 min easy
270m
4
13 JUL
42-Swim
5x(swim 4 lengths, kick 1 length, rest 1 min)
Off
70-Swim
Run- Sprint workout

3x1600 (400 RI)
Run- Tempo

2 Miles Easy
3 Miles ST
1 Mile Easy
Off
Long Run-

12 Miles at MP+45
7h 30m
 
85-Bike
20 min easy
10 min tempo
10 min easy
10 min tempo
10 min easy
10 min tempo
5 min hard
10 min easy
450m
3
20 JUL
46-Swim
3x(1 length fast, 1 length easy; 2 lengths fast, 2 lengths easy; 1 length fast, 1 length easy) rest 1 minute between sets
Off
Run- Tempo

1 Mile Easy
5 Miles MT
1 Mile Easy
Run- Sprint workout

2x1200 (2 min RI)
4x800 (2 min RI)
155-Bike
Off
Long Run-

14 Miles at MP+45
8h 14m
10%
93-Bike
10 min easy
30 min tempo
10 min easy
30 min tempo
13 min easy
494m
Peak
2
27 JUL
37-Swim
Off
62-Swim
Off
124-Bike
outdoors
Off
Run- Tempo

1 Mile Easy
6 Miles LT
1 Mile Easy
6h 36m
-20%
74-Bike
outdoors
37-Run
396m
Taper
1
3 AUG
23-Swim
Off
39-Swim
78-Bike
outdoors
Off
Off
RACE DAY-

Pittsburgh Triathlon
3h 30m
-30%
47-Bike
outdoors
23-Run
+Race
Taper


Pre-Race:
The race expo was held at Point State Park which is also where the actual race started and finished.  It was also where the transition area was set up.  This was nice in that you could get an idea of where things were going to be when you showed up at O' dark-thirty to get ready for your race. The expo was really small, and kind of lackluster.  There were a couple of booths and a station to get your bike inspected.  They also had a newbies meeting with a really good Q&A for those that had never done a TRI before which was a nice touch but with the size of this race combined with the Sprint and the Adventure race I expected a better expo.  The few vendor booths they had set up were really just not that impressive.  One thing that they did have which Kim and I didn't partake in was a swim session in the River so that you could get a feel for the water.  I thought that that was a really good idea and, had we not been having childcare issues I probably would have taken them up on it.
 
Since we live right on the light rail line and since it worked out so well for us during the marathon we had planned to ride the T into the race on race morning.  Little did we know that the T doesn't open up early enough to get in in time before the transition area closed.  The transition area closed at 6:15 and the first train leaving our stop didn't leave until about 5:45.  I wasn't going to try to cut it that close so we chose to pay the $10 to park and drive into the city.  The good news was that at 5am on a Sunday there was no traffic and we cruised right in.  

We got to the transition area and got checked in.  They had a pretty good security system with your race number on everything to check in and out of transition and we posted up our bikes and running equipment with plenty of time to spare.  We even had time to take a selfie. 

The race:

Swim:

The race itself was really well organized I think.  We walked out to the swim start, since there was a pretty small field (about 150 participants) for the International distance Tri they only had two waves.  The first was all of the men and 5 minutes later was all of the women.  It was an in-water start, so with about three minutes to go the race officials started having folks jump into the water.  I have to say this was a little nerve wracking as it was about a four foot drop from the bank into the river but There was plenty of water there to keep from hitting bottom.  I, not wanting to tread water for three minutes waited until they made the announcement that they needed ALL the swimmers in the water and I made the plunge.  Shortly thereafter they called for the start and we were off and swimming.  Now this is by far my most difficult event.  In fact up until about two years ago I didn't even know how to swim with my face in the water and swimming one length of the pool  was a struggle for me.  Since then I have come a long way but I still swim more like a rock than a fish.  The swim started off upstream on the Allegheny river and then crossed under all three of the "Three Sisters Bridges" before we saw our turning buoy and made the turn to head back downstream.  Once heading downstream we were further out into the river which made it more difficult for me to sight the buoys but overall it went relatively smoothly.  I was keeping with my race plan and keeping pretty good easy strokes and really focusing on my breathing.  I also hadn't drowned yet when all of a sudden, BANG!  somebody ran into me hard.  I looked up and saw Kim's tri suit and her Pink goggles.  She ran into me just under the last of the Three sisters.  What are the chances that out of the 150 people in the water she would run into me.  I was actually pretty happy about it though because that meant that Kim was having a really good swim.  At that pace she was on track to pass a good portion of the men even though they all had a 5 min head start.  The rest of the swim was uneventful and I made it safely back to shore without drowning.  Success!

Transition 1:

The Swim to run transition was a really long one.  We had to run almost a quarter of a mile from the Swim out point to the transition area.  This was all on a hard concrete surface so it was pretty hard on the feet nothing impossible but not the greatest either.  When I got into the transition area I knew just how poorly I had done on the swim when I only say a few bikes on the racks on the men's side.  As it turned out I came in 132 out of 156, so it was a truly bad performance.  I had a decent transition coming in at just about half way for the field in just over four minutes, which considering the run in, I think was pretty good.  One thing I did forget to do though was to switch my watch over to biking so my transitions/biking stats area  little off on Garmin Connect.

Bike:

The bike was my best event this race.  The course was an out and back and was two loops.  I knew that coming out of the water I was way behind so I tried to push hard on the bike. Pretty quickly I started passing people so I knew that I was on the right track.  What I didn't realize was that the bike course had a monster climb on it.  It wasn't that steep, but it was essentially a six mile climb and them a six mile descent for the first loop and then over again for the second.  I ended up picking off quite a few people on the climbs which was nice but then I would get passed again by a few on the descents.  I was wearing a regular buike jersey and I was on a standard road bike so the folks in tri suits and on tri bikes with aero bars could just get more aerodynamic than me.  Lesson learned for next time.  I did the best I could on the downhills though and got deep into the drops and kept pushing my biggest gear at around 90 rpms.  With that it put me at right around mid way in the field.  Considering this was my first race of this distance I was really happy with that time.

Transition 2:

The Bike to run transition was pretty easy.  It was at the same location as the swim to bike so all o f my gear was already set up and I had already been there a few times so there was no confusion over where to go.  Really nothing to report here, it was just a matter of slipping off the bike shoes and sliding into my running shoes and I was off.  It took my just over 1:30 to complete the transition which put me at right about half way through the field again.  Same as my first transition, which considering I haven't really worked on any strategies to make this go faster I figure is pretty good.

Run:
As per usual  for me, coming off the bike my legs felt like a ton of bricks. I started running anyway and headed off to start the 10K.  It was one of those sort of runs where you start bargaining with yourself.  It started with the "I will stop to walk at the turn around point", and then  once I reached the Turn-around, "I will stop to walk at the 4 mile mark", and then I reached the four mile mark and all of a sudden I was feeling pretty good.  I wasn't moving along at a blazing speed but I had passed a few people and it got my energy going again.  In fact a women I had been going back and forth with on the bike with  I had caught back up to on the run.  I then made it my goal to pace off of her and pull myself through to the finish.  The course was a really pretty out and back along the riverfront so there was plenty to look at, although I don't think I actually looked at any of it.  I was pretty focused and determined just not to give up at the end.  I ended  up finishing with an average time of about 9:30 miles.  I know I can run a lot faster next time but at the beginning of this thing I only had two goals.  Not drown...check, and finish...check.  I can say I went out and did both of those with a smile.  An added bonus was that I finally beat my wife on a long distance course.  I almost always win when it is a shorter race (half marathon or below)  but she has always won on the Marathon distance.  This time I came out on top.  Pretty good day for  everyone!

Overall Impression: 

The race itself was really well put together and well organized.  There was good support on the run with water stops and the bike course was laid out so it was easy to understand.  The Swim had plenty of support from life guards and the buoys used were easy to spot.  The major gripes that I have with the race were in the details that surround the race.  The expo was severely lacking.  There wasn't much in the way of vendors and it was kind-of a big letdown.  The finishers medals and the shirts were really boring as well.  This must be a Pittsburgh thing because the finishers shirts for the Pittsburgh Marathon were boring too.  Now those two things don't really matter for the race itself, and I would much rather have a well put together course than a nice shirt but it is definitely something they could work on for next year.  The only major issue I had with the course was that the bike was mostly on the HOV lane of the  Highway.  Pittsburgh is a great city and there are lots of places that would be nice to show off and to see.  The Pittsburgh Marathon did a great job of this and the swim and the bike routes were great in showing interesting parts of the city, but the bike route while not a bad place to go out and ride really didn't add anything extra to the experience.  One thing I might add that the sponsor of this race is the Friends of the Riverfront, who built both the three rivers water trail and the three rivers heritage trail.  Next time lets do the bike on the trails.  I understand that this might be a logistical problem in closing off a popular trail but I am sure it could be done.  I look forward to seeing what this race has in store for next year.

Saturday, July 18, 2015

Mt Davis, Pennsylvania State Highpoint

State Highpoint number 11 complete!

This highpoint was a Fathers day trip out to the Laurel Highlands region of western Pennsylvania. A few weeks ago, Kim had asked me what I wanted for Fathers day, and honestly, I'm not a big present guy.  I would much rather share experiences, so I told her I would like to do a local high pointing trip.   The original plan was to try and nab all three local high points (PA, WV, and MD), but after looking at the travel time, and how long our 18 month old would last in the car we determined it would be best to only do one.  We picked the closest (Mt Davis) and then planned a few other activities to go along with the trip to make it a weekend. 

We made our way down to Mt Davis from Pittsburgh early on a rainy Saturday morning and hoped that the weather would clear.  Unfortunately, the rain was persistent so we stopped for lunch at a local sandwich shop and watched the rain for a while.  Eventually it gave up and the sun peaked out.  At about 12:00 we made our way to the parking area at Mt Davis State Park.  We knew that the summit was essentially a walk up but had expected at least a little bit of a walk so we loaded our Son into the baby backpack and got underway.  The mountain laurels were in bloom all over the place which added a nice touch to "climbing" this highpoint during this time of year.
A little to our surprise the "summit" was only about 100m from the parking area.  We scaled the observation tower much to our small traveler's delight and spent some time taking in the sights.  There is a plaque showing the topography of the area which I thought was really interesting.
After coming back down off of the tower we decided to wander around a little bit and check out some of the trails in the area.  There is an interesting information center built just to the east of the tower that we perused and then did a short hike down some of the local trails but ended up turning around due to the fact that the trail was turning into a stream from all of the recent rain. 

Afterwards we headed into Confluence, about a 15 minute drive from the highpoint and on to our next adventure.  The little guy didn't feel like taking a nap at the Bed and Breakfast so we pulled the bikes off of the back of the car and loaded him into the bike trailer for a ride on the Great Allegheny Passage trail up into Ohiopyle State Park.  This is a really cool ride and I highly suggest it to anyone looking for something to do.  We were on our Road Bikes (skinny tires) and although we didn't run into a flat tires I think I need to either look at a different bike or maybe some new wheels/tires for rails to trails riding.  Nevertheless we rode about 10 miles into the park and then started working our way back to the bed and breakfast when the sky started to turn dark on us.  It was the sort of dark when you know the sky is just going to open up.  We picked up the pace a little to try and beat the rain and for a while it looked like we were actually going to make it.  Not the case.  With about 1.5 miles left the skys opened like the world was going to end.  Luckily our son was in his bike trailer with a rain fly so he stayed nice and dry but Kim and I were soaked through to the bone.  The trail turned pretty bad too, at points we were riding through almost 3-4 inches of water.  Finally we made it back to the B&B to shower and dry out.  

That night after J went to sleep we hung out downstairs with a group of people staying at the B&B with us.  They were all biking the entire GAP trail from Pittsburgh to DC.  It's about a 350 mile trip and they were all staying at local trail town B&B's along the way.  It was really interesting to hear from them how they were planning thier trips and what they had done along the way.  I had never thought about long distance cycling trips like that but it got the wheels turning.  I think a through tour of the GAP might be in my future...

On the way back to Pittsburgh we drove right by the Fort Necessity National Battlefield so we stopped to take a look.  This would be a great side trip for anyone climbing Mt. Davis.  It is pretty close to the high point and a really cool, really walkable place to visit.

Before we went to the park I had never really heard of Fort Necessity, but it is a really interesting story.  Long story short, this is where George Washington (at the time a Lieutenant Colonel in the Virginia Militia) holed up in a makeshift fort during a skirmish with the French who were colonizing this area of western Pennsylvania.  This action essentially started the French and Indian Wars,  It is really cool to see the scale that warfare took at that time.  Everything was considerably closer that it is now.  This is definitely a place to see, even J enjoyed himself!

Monday, June 15, 2015

Standing Cedar Planter with Corrigated Steel


After moving earlier this year Kim and I had been going back and forth over where to plant a garden at our new house.  The problem was that there was literally nowhere in our new yard that seemed to get enough sun.  We are living in a Duplex and our side of the duplex is shaded by the house or the many towering trees in/around the property.  The only place we found that got a decent amount of sun was in the driveway in the back of the house.  The other thing we ran into was that since we are renting we couldn't just go around pulling up grass and putting in a garden.  The best solution we could come up with was to build a planter on legs that can support a garden.  We could put it out on the driveway with no problem and the best part is that the next time we move we can take it with us!  Problem solved, now all we had to do was build it.

Here is how we did it, these instructions will build you one planter but you can (and probably will) end up building more once you finish the first one. 

First, here is a list of tools you will need:
  • Chop Saw/Miter Saw
  • Cordless Drill
  • Pocket hole Jig (I use one made by Kreg)
  • Staple Gun
  • Tin snips
  • utility knife or scissors
  • One or two clamps
Next here is the shopping list, you can get everything you need at any big box home improvement store:
  • 6 pcs 1x4x8 Cedar
  • 1 pc scrap 2X4 about 6' long
  • 1 sheet 8'X26" galvanized corrugated steel
  • 1 roll landscape fabric
  • 1 roll wire mesh (36" wide)
  • 1 box 1 1/4" exterior screws
  • 1 box 3/4" galvanized screws
  • Staples
The total build time for an experienced woodworker will be about 3-4 hours.  Probably double that if you are doing this for the first time, but it is a very simple project if you have the right tools.
Step 1:  Cut out all of your cedar pieces to build the frames.

Cut list:
     8x 32" -these will be your legs you should be able to cut 3 each   out of your 8' pieces
     4x24"  -these will be your sides you should be able to cut all four out of the same 8' piece
     4x41"  - these will be the rails in the front and back

Once you cut all of these pieces out you will be left with only one peice of 32" scrap (which you can use to make tomato stakes)


 Step 2:  Assemble the frames

The way this is put together is essentially just building four frames which we then screw together.  Each frame is made exactly the same so I will show one and then the other three are done the same way.

First take all of your 24" long pieces and all of your 41" long pieces you will be pre-drilling all of these.  It is easiest to set up an assembly line and to drill them all at the same time.

Using your Pocket Hole Jig, set the pocket jig to the depth of your material and pre drill two holes on each end.  I wanted to have a "rustic look" so I drilled my holes on the flatter side of the board, that way the rustic side will be facing out.

Once all of the holes are drilled, clamp the rails to the one of the legs and run an 1 1/4" exterior screw into each hole to hold the frame together.  The first rail will be held flush to the top of the leg and the second will be held 16" down from the top, this will give you your 16" depth for your soil.  Attach your second leg to the other side the same way and repeat to build all four frames.


When you are finished you will have four frames that look like this.  Since you used a pocket hole jig all of your connections will be hidden on the inside of the planter so it will give a nice seamless look.


Step 3:  Assemble the planter.

First you will need to drill some more pocket holes.  Take the two smaller frames (the ones that will be the sides) and bring them back over to the bench.  You will drill three pocket holes about equally spaced through the length of each leg for a total of 6 pocket holes in each leg.  These will hold the two side frames to the front.  When the holes are drilled it will look like this:


Once all of the holes are drilled you will need to clamp the side frames to the front frames.  I found this to be much easier if I had a second set of hands.  It is also much easier if you do this part with the frames flipped upside down.  Once the frames are clamped together just simply run screws through the holes again just like when you were building the frames.


Step 4:  Adding supports:

For my supports I am using two pieces of scrap 2X4, now I realize that this wood is not rot resistant, you can use cedar if you want to, or pressure treated wood but I wanted something that would hold a little better than cedar and I didn't want any pressure treated wood to leach into my food.  I figure if it rots I will replace this piece ever couple of years.

Simply cut two pieces to fit the short way across the planter,  run your pocket hole jig one more time and screw the two supports to the bottom of the frame.


Step 5: Add the wire mesh:

At this point you can unroll your wire mesh and cut to size using your tin snips to fit the bottom of the planter.  You are going to want to leave approx 2-3" of extra material that you can roll up the sides of the walls to hold it in place.  The easiest way to do this is to roll out the material on the top of the frame and then cut to size.  Once you have it the right size do all of the bending to make a sort of "tub" with the wire mesh.  Bending ahead of time will save you a lot of heartache.  I also notched the corners so that they would make a nice corner.  Here is how I did that:


 Once in place use your galvanized screws to screw the mesh in place.  I used approx 4-5 screws on each side and then also screwed it down to the supports in the middle.


Step 6:  Add the corrugated steel. 

Using your tin snips cut down the corrugated steel into four pieces.  Simply measure the right distance to cover your holes for the length, and for the height cut the piece directly in half.  This will give you 13" of material which will be just right.


 There are probably better ways to cut this steel but I used my tin Snips.  It will be easy to cut the pieces down to length but it is a pain to cut in the other direction.  If your cuts are not pretty don't worry about it, all of the cut sides will be hidden under the dirt.


Once cut to size, drop the steel in place.  Use care the make sure it is put in so that it sits "flush" along the top end.  This will give it a cleaner look.  You will probably need to drill a pilot hole through the steel first and then run your galvanized screws in to hold it in place.  I used two on each end and then another three or so down across the bottom of each piece.


Step 7:  Add the landscape fabric.

Once the wire mesh is in place roll out the landscape fabric and cut to size to fit the bottom of the planter.  This fabric will ensure that your dirt stays in place but that water can drain.   You are again going to want to leave 2-3" of extra fabric on each side to allow the fabric to ride up the sides.  Attach the fabric using staples.


Step 8: Fill with dirt and Plant away!


Now, that wasn't so bad was it?  The only problem with building these beauties is that once you build one you are going to want more... that might be why I ended up with the second one.  Overall I am very happy with the result.  I hope you have as much fun building these as I did.  Enjoy!


Wednesday, May 20, 2015

Massachusetts Highpoint: Mt Greylock trip report

Kim and I, at this point in our lives were just getting ready to graduate College and were out looking for a few fun hiking trips to do in the local area.  I had already done a quite a bit of hiking, but Kim was new to it so I was looking for something that would be fun but not too strenuous and I came across Mt. Greylock.  As it happened, it is the tallest mountain in Massachusetts, and, since I had already climbed Mt Washington in New Hampshire it would give me two of the 50 state highpoints.  This climb is really what got me into state Highpointing and it has followed me as a hobby for the last 8 years or so. 

With that being said, we planned for a quick weekend day trip out to Adams, MA where the highpoint is located.  We picked the Gould trail for our ascent, mainly because it was about the right distance.  This mountain is criss-crossed with a hundred different possibilities for climbing and can even be accomplished as a drive up but we were looking to make a day of it and didn't want to just drive it. 

The Gould Trail, like many others started out pretty tame with a gentle sloping ascent for the first mile or so and then gradually got more steep as it went.  It was a foggy and slightly rainy morning so the trail was a little soggy but otherwise it was a pretty climb.  The trail guide lists this trail as rising 3.4 miles to the summit and it is listed as "Strenuous"  while I would say that it got me breathing heavy from time to time it was a very easy trail with little to no areas that I would consider "Strenuous". 

There weren't many unbelievable views due to tree cover, and any that we would have been able to peak through the trees were covered by the fog. We made it to the summit in a little over two hours and took some photos but by this time the rain had started to pick up. 
There is a really cool war memorial tower at the summit which, on a clear day would make for a great photo op for this highpoint.  But by the time we got there the fog was so thick you could barely make out the tower if you were standing under it, which you can see below ... we were.

Mt Greylock summit at base of War Memorial with Fog rolling in
At the base of the War Memorial with fog rolling in
 
 The way down was similar to the hike up with no major issues to report.  The total trip probably took less than 4 hours with time to eat some sandwiches on the trail.

Overall it was a fun little day hike in Western Massachusetts and a definite go to hike if you want to bag a highpoint with Kids as it was pretty easy to navigate.  I would recommend forgoing the auto road and getting out to walk a little in the woods.  Enjoy!